As seen on
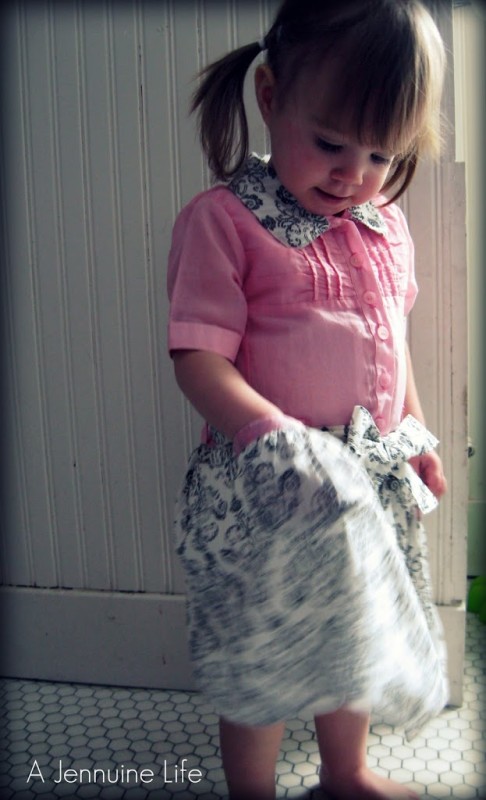
Shwin&Shwin’s Project Toddler Runway, here is the tutorial behind my project:Â The Arden Refashioned Shirt Dress.
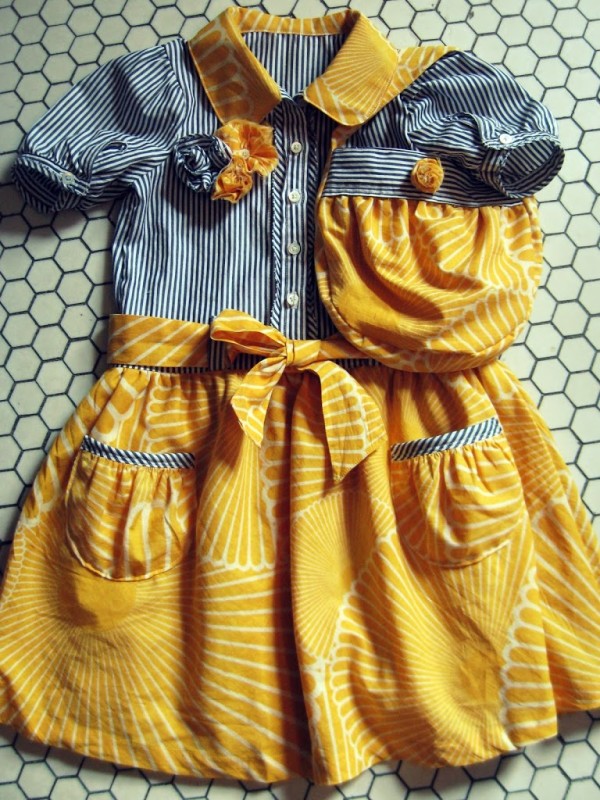
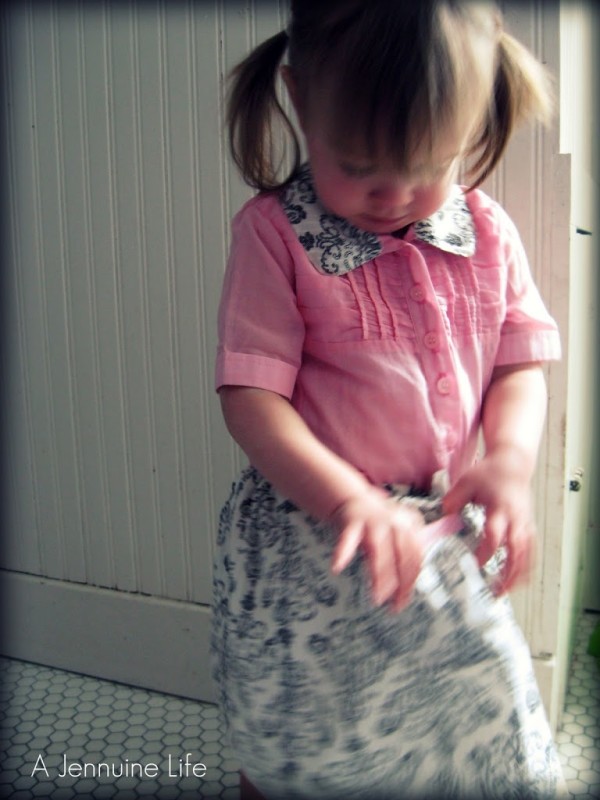
Turn a shirt and a skirt or a dress into a refashioned shirt dress! In the excitement of creating the first project for my first blog competition, I didn’t take photos along the way. So, I dug into my “to be refashioned” stash of clothes and found another candidate for my shirt dress. This actually turned out to be a good thing, as it pointed out a few areas along the way which could differ depending on the style of shirt/skirt you have.
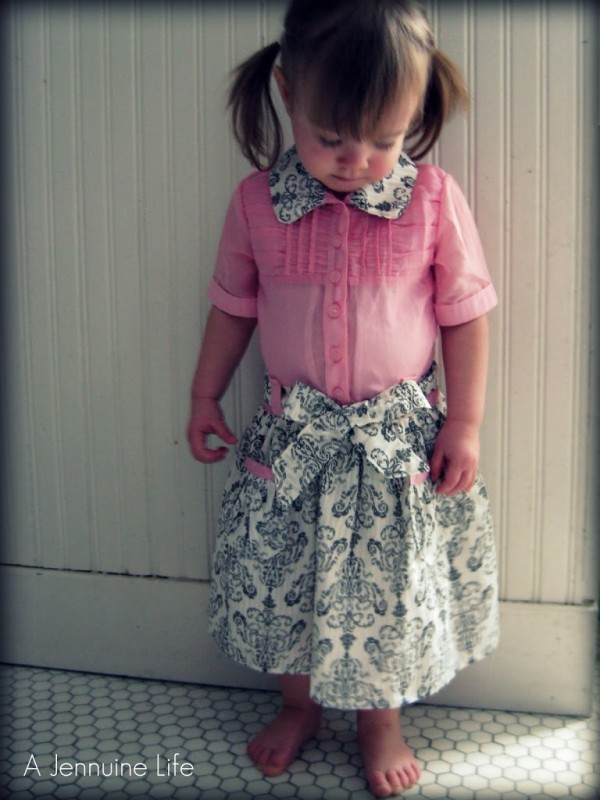
Arden Refashioned Shirt Dress
Skill Level – Intermediate
Items Needed –
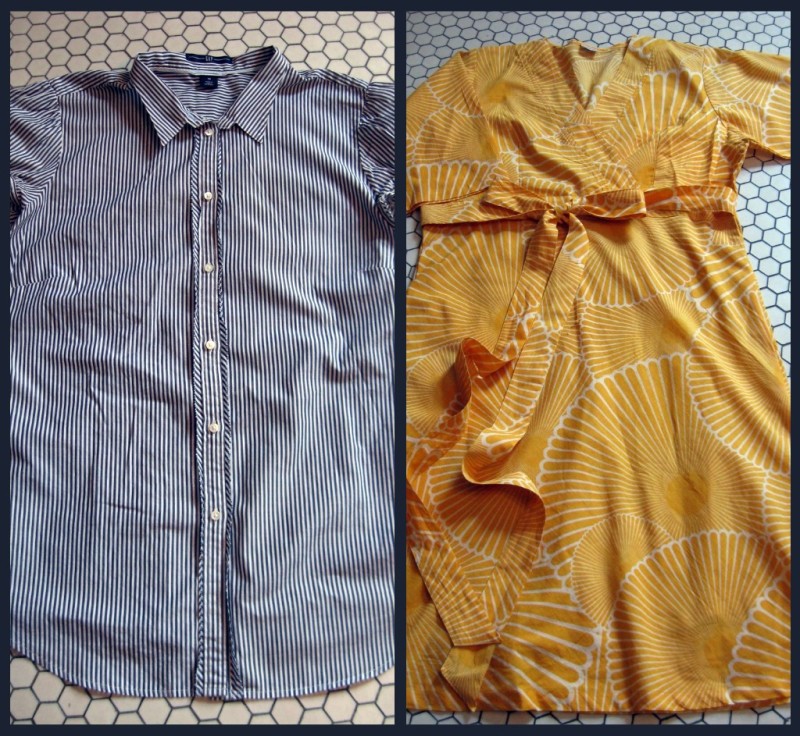
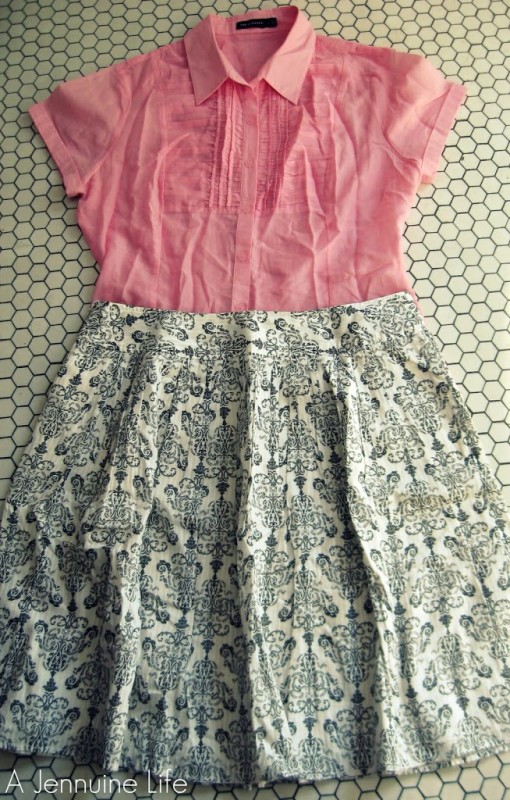
Shirt
Skirt or Dress
Lightweight fuseable interfacing
Thread
Sewing Machine
Iron
Dimensions given are for a 2T shirt dress. Adjust accordingly to get desired size. Sew with a 3/8″ or 1/2″ seam allowance; keeping the same allowance throughout the project. I used a 1/2″ seam allowance.
A short-sleeved shirt is the easiest for this, but a long-sleeved shirt would do just fine. Pretty much any skirt would do, though both of these were lightweight cotton and therefore, lined. You could do this pretty easily without a paper pattern; using an existing woven collared shirt to make your own. I had a nice pattern to use which made this easier.
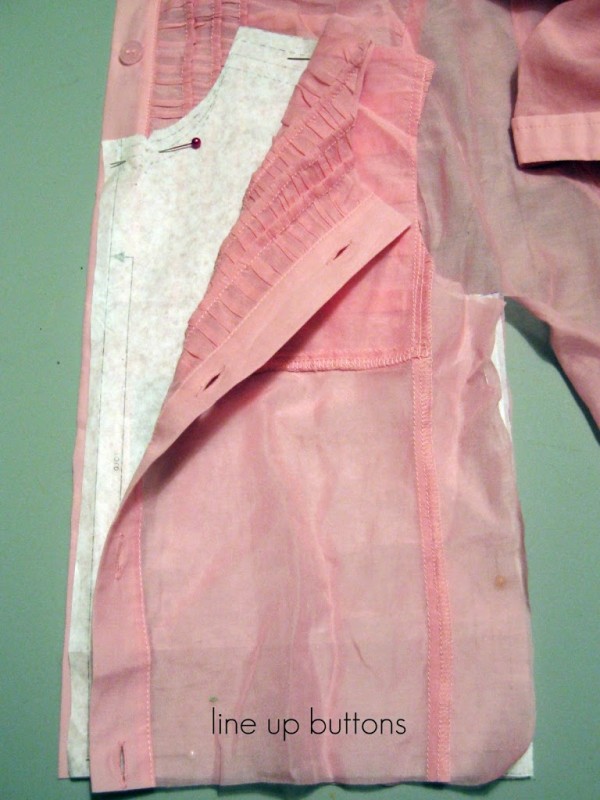
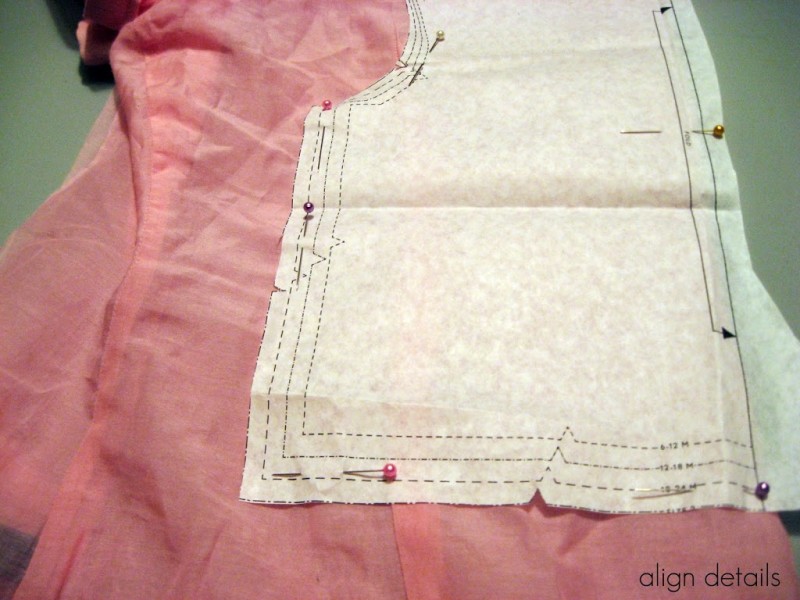
1. Cut your front piece. Likely your pattern will be only one side like this one. If that’s the case, then be sure to line up the “fold” edge on the middle of the placket (the strip where the buttonholes/buttons are), so your shirt front isn’t too wide. We already have our placket created, and our buttons mostly finished for us. This shirt had a detail that stopped halfway down the shirt. I wanted this to also stop halfway down the smaller version. Also watch the placement of the top button – it should be about an inch from the top, so it doesn’t get in the way of the collar.
2. Cut other front piece. Make sure to lign up buttons and any details. I laid my first piece on top so I could be sure to line everything up. Again, align the “fold” line with the center of the placket.
3. Cut back. This was easiest to do with the shirt folded in half. Make sure any details like darts are lined up when you fold. Both versions have had a dart in the back, and it looks fine running up to the sleeve seam.
4. Sew shoulder seams. With right sides together, sew shoulder seams. Finish edges by serging, zigzag, or overcast stitch.
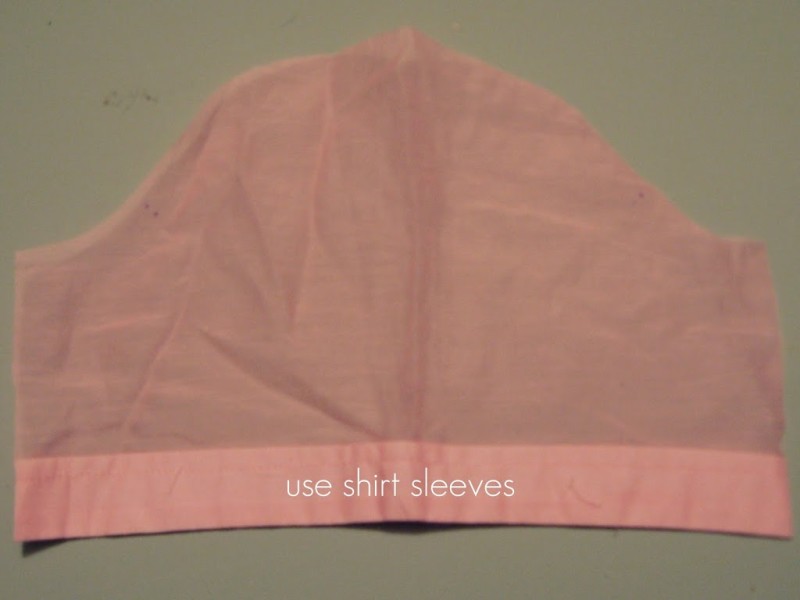
5. Cut sleeves. This will depend on your shirt. On the first one I made, I was able to use a seam ripper and remove the sleeves and only had to shorten the width of the sleeve – it fit right into the sleeve opening. For this one I had to cut a piece out using the sleeve pattern from the shirt. Try to use the finished edge.
6. Gather sleeve top. Run two basting stitches close together along the bell, or top, of the sleeve curve and pulling the bobbin threads gather slightly. With right sides together, match up the armpit edges of the sleeves with the shirt front and back – pin in place. Pin the center of the sleeve at the shoulder seam. Ease in the rest of the shirt, adjusting the gathering as needed. For my first shirt, it was already nicely gathered.
7. Sew sleeve. I find it works best to carefully guide the bottom, or shirt, layer of fabric so that it’s perpendicular to the needle as I sew. This helps prevent puckers or pleating. If it doesn’t look right, rip out any bad sections and re-sew.
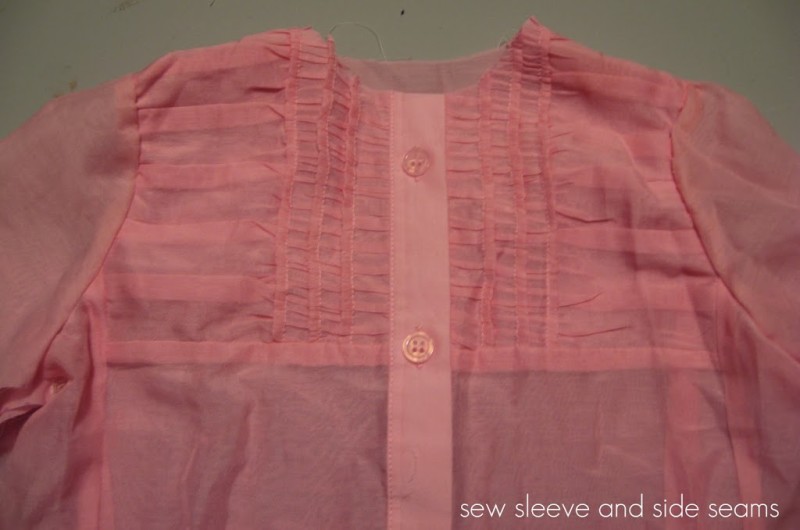
8. Sew sleeve and side seams. With right sides together and matching edges and seams, sew the front and back of the shirt and sleeve together at the side seams.
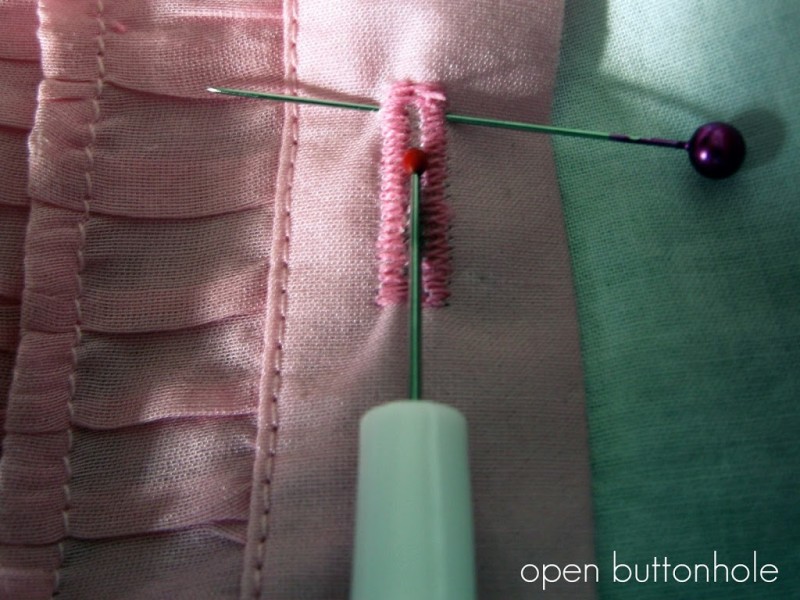
9. Add buttonholes. To keep the scale appropriate for a child, add additional buttonholes and buttons to the shirt. Cut off the buttons from the unused portion of the shirt placket. Measure and sew buttonholes evenly between the existing ones. When you cut the buttonhole open, it’s safest to put a pin at the end just inside the thick stitching to prevent over-cutting the hole. Trim edges. Sew the buttons on the other side to correspond to the new buttonholes.
10. Cut skirt pieces. This will depend a bit on your skirt. The first dress was an a-line, so I was able to lay the dress out and use a rular and rotary cutter to cut off the bottom 11″ of the outer skirt. Then I cut the lining material about 1″ shorter. The second skirt was gathered, with a slit along the leg. I cut off the waistband and side seams to get a flat piece of material. Then I cut a rectangle 11″ x 48″, keeping the finished hem. The lining was a-line, so I cut the lining material 10″ long and tried to match the angle of one of the seams.
11. Sew side seams. With right sides together, sew side seams of skirt. Repeat for lining. Finish edges.
12. Finish waist edges.
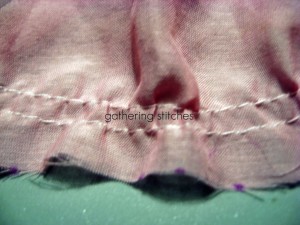
13. Sew gathering stitches. Run two basting stitches close together along the top edges of the skirt and lining separately. Stop stitches at the side seams so you can gather the front and back independently.
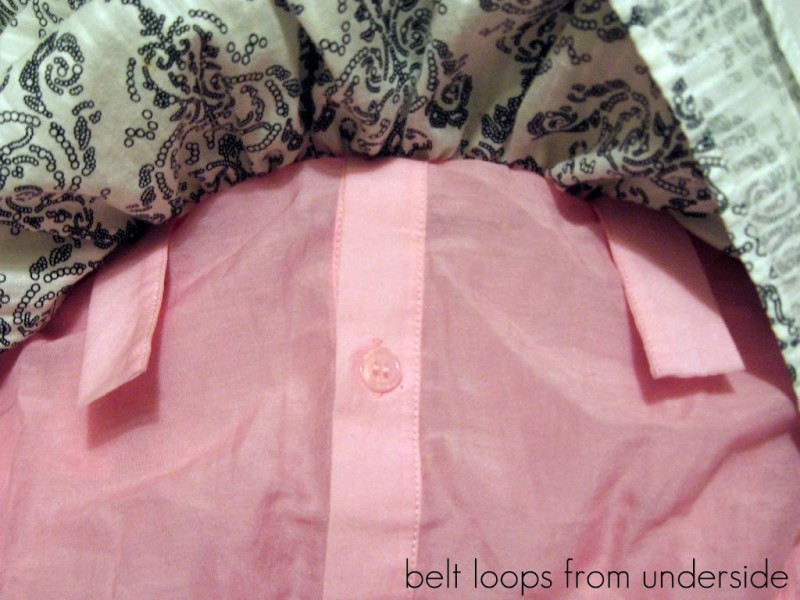
14. Make belt loops. For the first dress, I cut a strip 1 1/2″ x 15″ long out of the shirt material. Fold in half lengthwise and sew with a 1/4″ seam allowance. Turn and press (topstitch if desired), and cut into 2 1/2″ lengths. For the second dress, I used the scraps of the placket; trimming the raw edges right at the finished edge.
15. Pin belt loops. Pin the belt loops to the shirt with raw edges aligned. Mine are placed about 2″ away from the placket at the front, and 2″ from the center of the back.
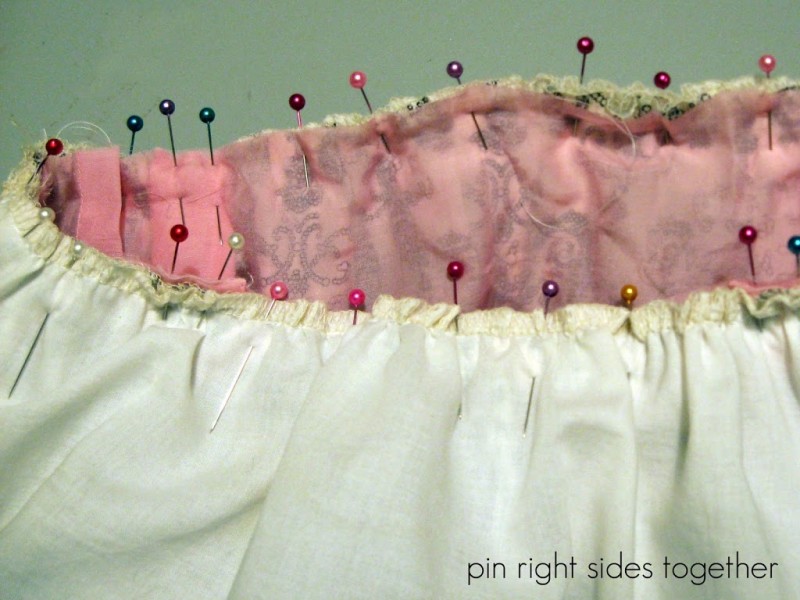
16. Attach skirt to top. With right sides together, match up side seams of the shirt, skirt and lining. Pin side seams in place.  By pulling the bobbin threads on the skirt and lining, gather the skirt pieces to fit to the shirt. Pin in place. Sew.
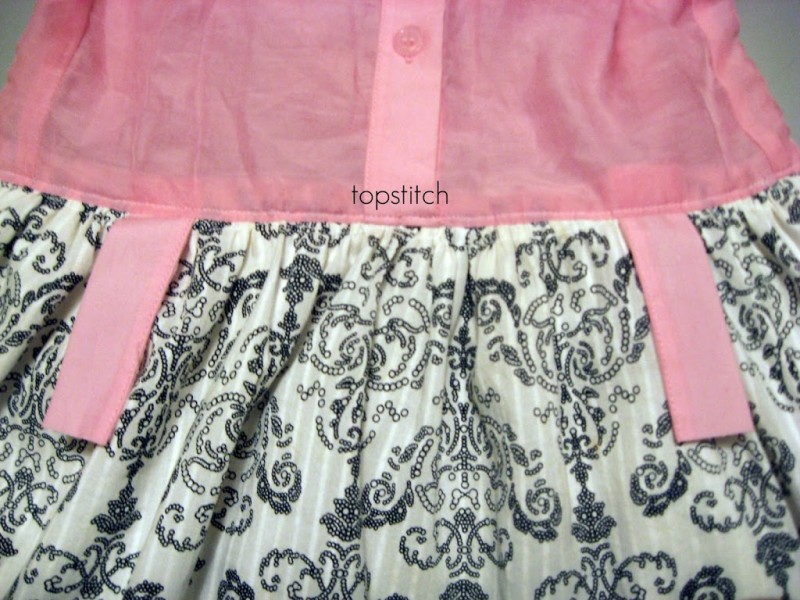
17. Press and topstitch. Press seam allowance toward shirt. Topstitch along the shirt edge.
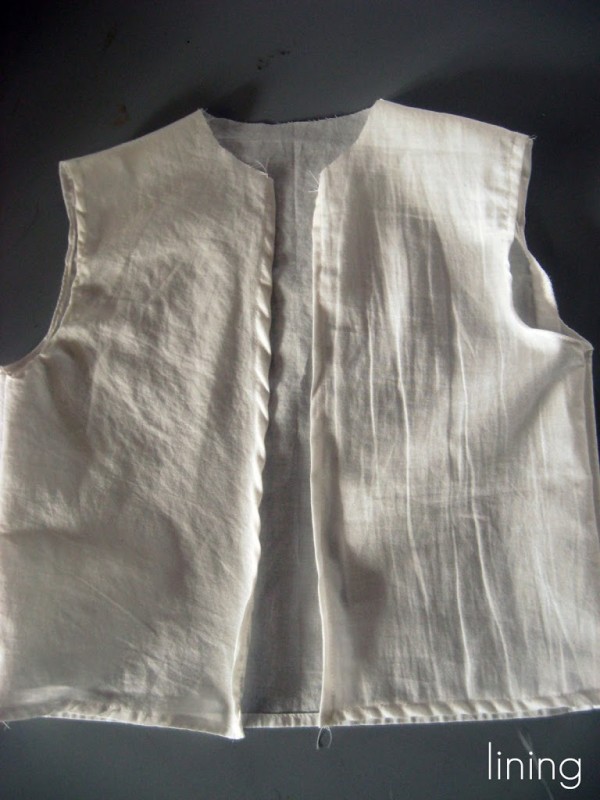
It was at this point that it became clear that the shirt I was using was too thin to continue without lining it. If this is the case for your shirt, follow along. If your shirt is thick enough like my first shirt was, then skip these steps.
A. Create lining. I used the same pattern pieces for front and back to cut pieces from the skirt lining.
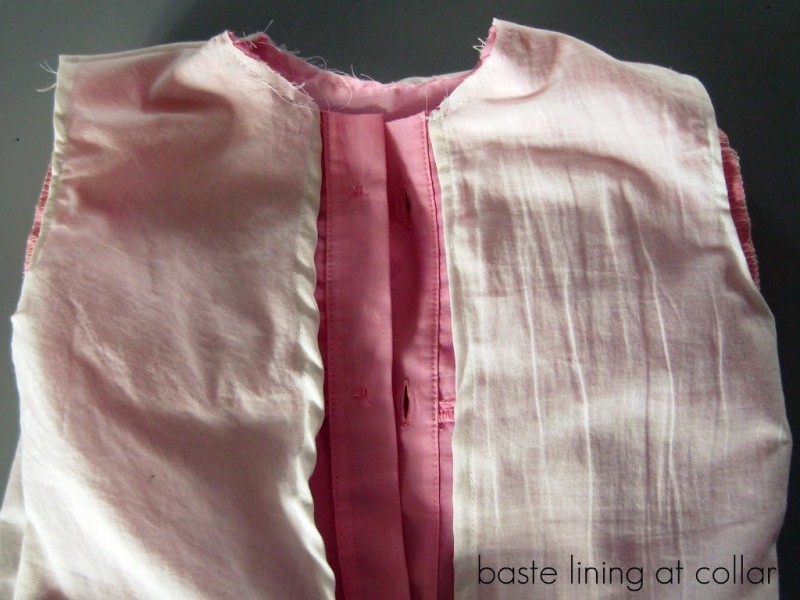
B. Finish edges.  On bottom, front edges, and armholes with a 1/4″ rolled hem. Leave neck opening unfinished.
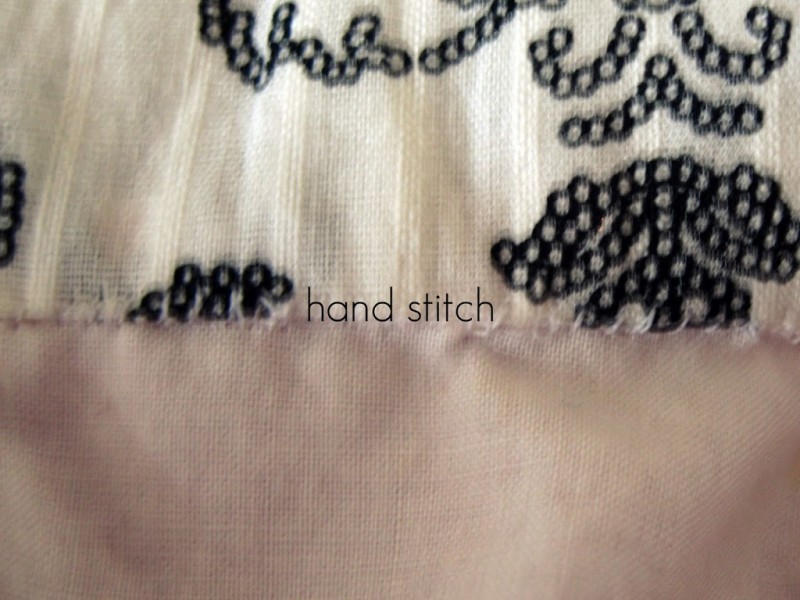
C. Baste lining at neck opening. Using a longer stitch length and with wrong sides together (seams on lining away from the body), baste the shirt and lining together at the neck opening.
D. Tack lining in place. By hand, tack the lining in place at bottom of front, bottom side seams, and armholes.
Continue on:
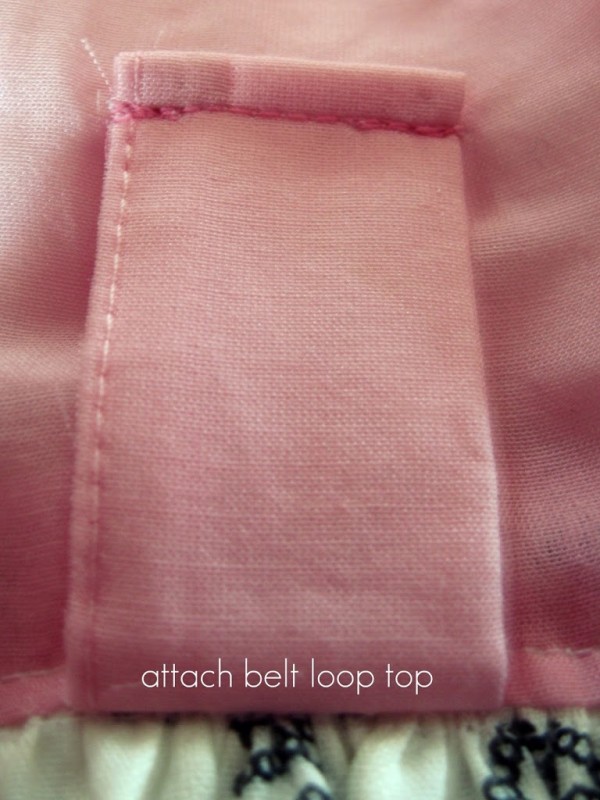
18. Attach belt loop top. Fold raw edge under 1/4″ and top stitch in place, staystitching at beginning and end for durability.
19. Make sash. Cut a piece from the skirt material 4″ x 50″, piecing as necessary. If you’d like it to have an angle, cut matchinge triangles from the short edges to form an arrow. Fold right sides together and sew, leaving an opening to turn. Clip corners and turn. Topstitch.
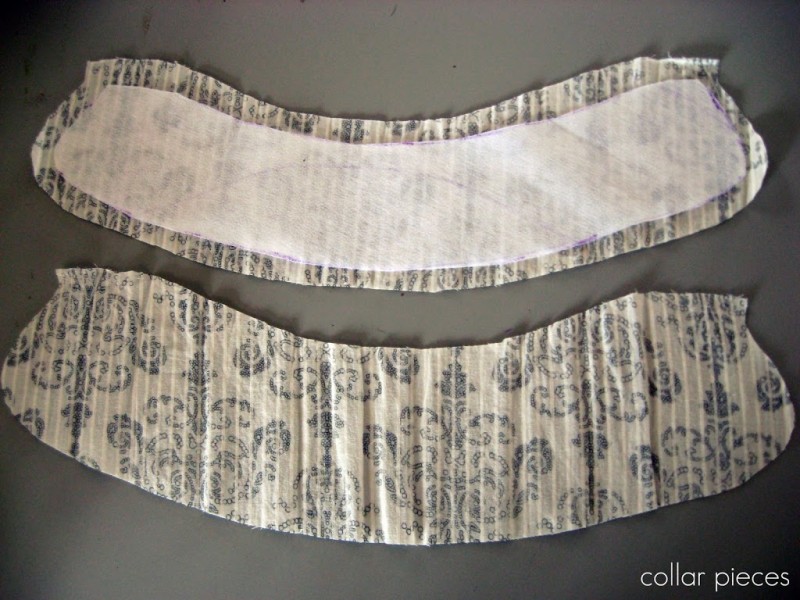
20. Cut collar pieces. If you don’t have a paper pattern, trace your sample shirt collar. Cut a piece of lightweight fuseable interfacing and then cut the seam allowance off. Fuse the interfacing to the wrong side of one piece.
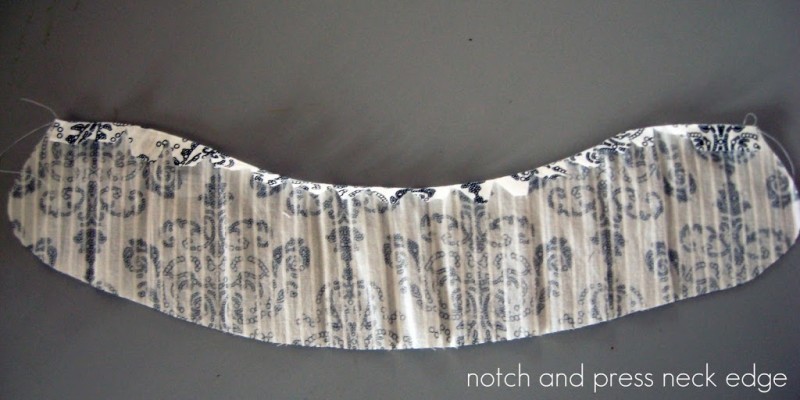
21. Notch and press neck edge. Sew a basting stitch along the raw collar edge of the piece without interfacing. Notch along the curve up to the sewing line. Press toward the wrong side along the basting stitch.
22. Sew collar edges. With right sides together, sew the edges of the collar together, leaving the neck edge open.
23. Trim seam allowance. On sewn edges, trim the seam allowance to 1/8″. Turn and press.
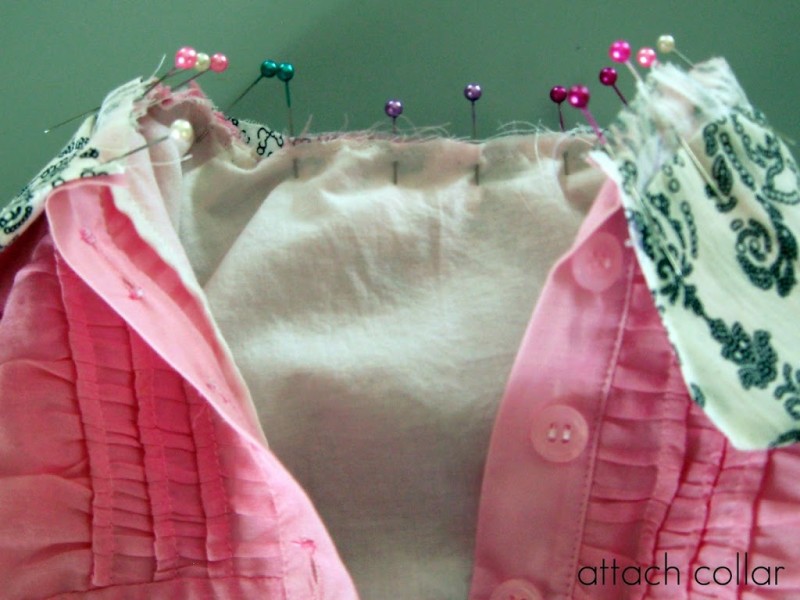
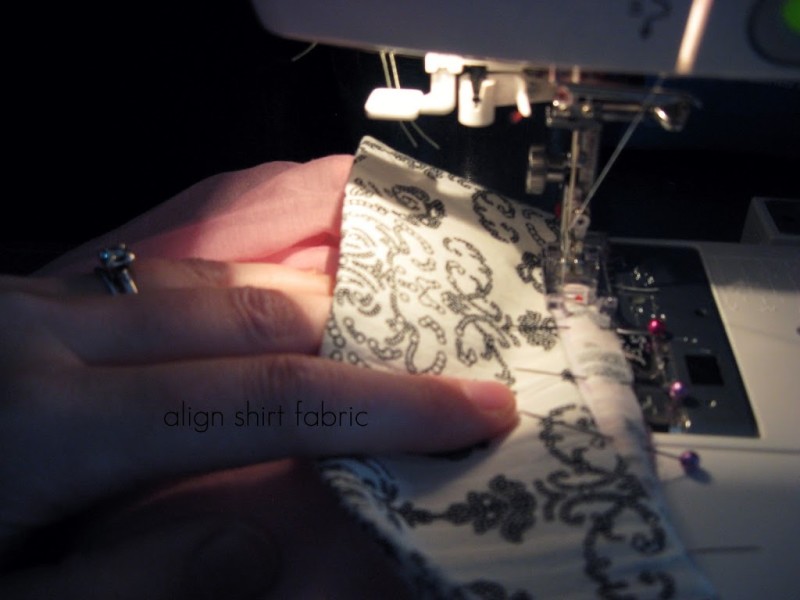
24. Attach collar. Pin the side of the collar that hasn’t been pressed open to the right side of the neck opening. Match placket edges and center back, easing in any fullness. Stitch only this piece; making sure not to catch the other side of the collar.
As you sew, make sure the shirt fabric is perpendicular to the stitching; pulling slightly with your left hand.
25. Hand stitch inside edge of collar. Pin the inside ege of the collar covering the stitching from attaching the outside edge. Hand-sew using a small whipstitch or blindstitch.
26. Topstitch collar.Â
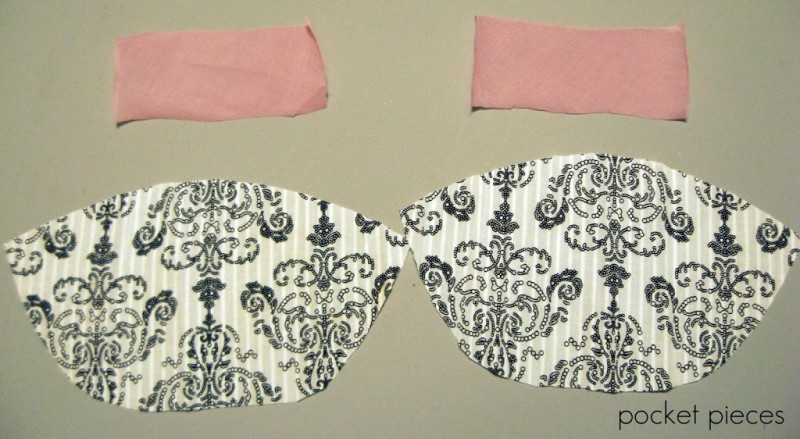
27. Cut pocket pieces. If you have a pattern for patch or other pockets you like, use that. You could make these squares without a pattern pretty easily. Mine is a rounded gathered patch pocket, with a piece cut 2″ x 4 1/2″ on the bias for the trim. Press the longe edge of the trim piece under 1/4″.
28. Baste and gathering stitches. Baste along the bottom edge of the pocket. Sew gathering stitches along the top edges.
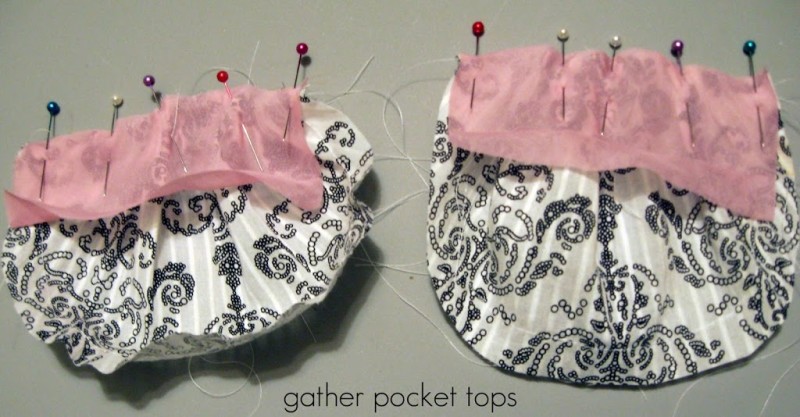
29. Gather pocket tops. Pin the trim piece at the edges and then pulling the bobbin threads, gather the tops evenly to fit. Pin and sew.
30. Finish trim. Press the trim up towards the gathered top.  Press the curved bottom edge of the pocket under along the basting stitch, keeping the edge as smooth as possible. Fold the trim over the raw edges, and pin the folded edge, so it covers the trim’s seam stitching on the wrong side. Topstitch from the right side, reinforcing the corners with a triangle or x shape of stitching.
31. Attach pockets. Pin the pockets to the dress. I placed mine 2″ down from the waist of the dress and lined them up using the belt loops as a guide. Topstitch in place along the outer edge; keeping the top open.
Enjoy! I know this is a long tutorial; it seemed easier when I was doing it. I think the results are worth it, though.
I’ll be linking up to the parties in my Linky Party Directory, and to:


Just saw this on the Kojo designs linkup! I LOVE it! The yellow and navy is adorable and I love everything about the dress! Thanks for the tutorial!
Very cute designs! Wish I could sew better and had a little girl to make it for!
Great tutorial. Can’t wait to see this week’s design!
Very sweet! And a fabulous tutorial!
Thanks for linking up to Making It With Allie! I can’t wait to see what you have for next week!
AllieMakes.Blogspot.com
That is so adorable…I might have to try this!!
~Julia
Julia – Please do! I’d love to see your results!
Oh so sweet!!
That is so cute! I wish I had a dress like this! 😉
Wow this is so cute! It looks like it was meant to be this way!
I so love it! I will be making this!, thanks for sharing, Sharon
Sharon – please share if you do! I don’t have a web album yet, but if a couple of people do I’ll make one and then share the projects. I’m so pleased that there’s interest in my little refashioned dress!
Just now saw ur link @not just housewife linky! Wow I like the color combination of strips and yellow. I have to make one for my daughter. Very pretty and great tutorial!
Esther
http://www.creativitymypassion.blogspot.com/
I totally voted for your yellow dress on Toddler Project Runway! I obviously didn’t know it was yours until after, but it was the best! You are so talented. Thanks for linking it up!
Super cute! I love it. It will be featured on my blog for Check ME Out Saturday. Thanks for linking up such a wonderful project.
Thanks for auditioning for OMTWI! This is great!! Love that dress! Don’t forget to put a button on the post or in your sidebar.
LOVE IT….maybe someday I will have a grand daughter to make it for 🙂
me encantó! felicitaciones. muy buena la combinación. ojala algún día me salga algo tan lindo!