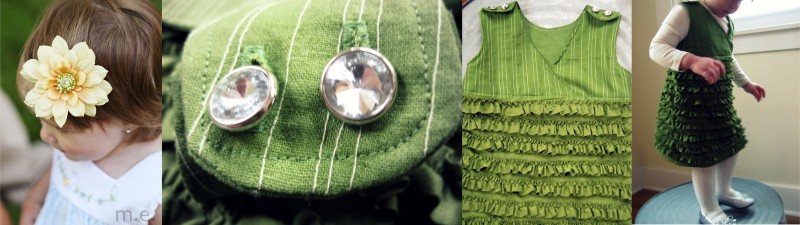
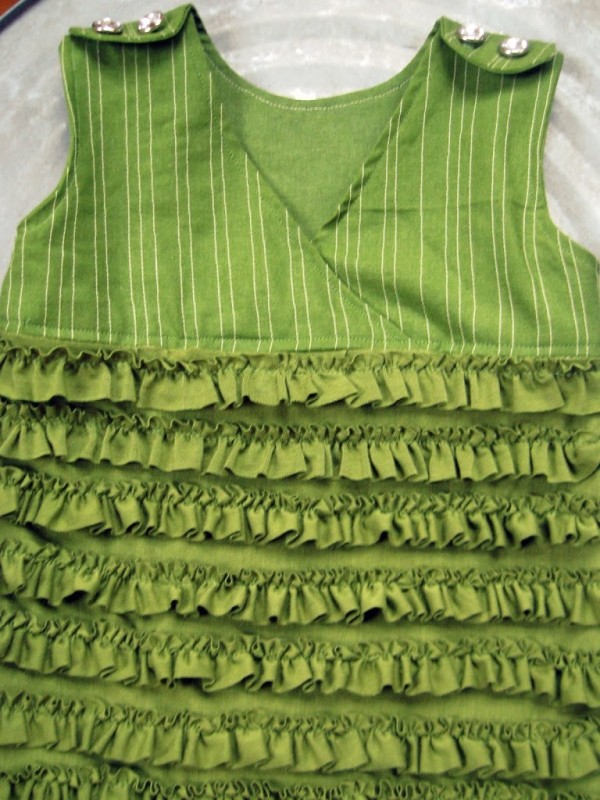
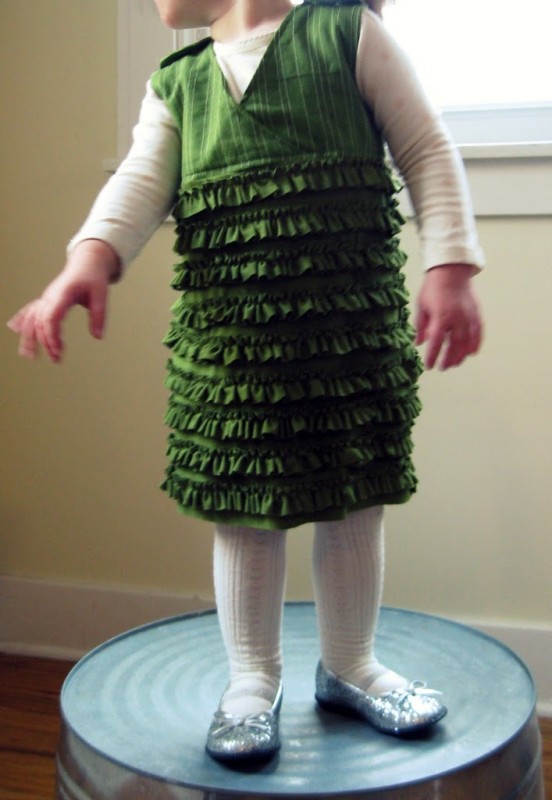
This was my Week 2 dress for Shwin&Swhin’s Project Toddler Runway. For this A Flower In Your Hair week, we were given a flower headpiece as an inspiration. My flower was a beautiful yellow with a green center and a little rhinestone accent. I didn’t want to go literal with a yellow and green outfit, so my doodling was immediately drawn to green like a stem or a leaf. That brought me around to ruffles, and I wanted them to be soft and floaty, so jersey knit was a great candidate. Then I wanted to bring some linear details in like a stem, so the stitching on the top. I’m an Alpha Chi Omega and our flower is the carnation. We have a song called In a Little Red Carnation that has a line about “richly ruffled out of green”. That song kept running through my head while I created it and hence the name – The Richly Ruffled Dress.

Richly Ruffled Dress
Skill Level – Confident beginner – intermediate
Items Needed
knit fabric -Â 1 yard, I used jersey
woven fabric - 1/2 yard was generous, I used linen
buttons
paper, scrap fabric, or pattern fabric
thread
rotary cutter
cutting mat/ruler
sewing machine
iron
Dimensions given are for a 2T dress. Adjust measurements and fabric requirements accordingly to get desired size. Sew with a 3/8″ or 1/2″ seam allowance; keeping the same allowance throughout the project. I used a 1/2″ seam allowance.
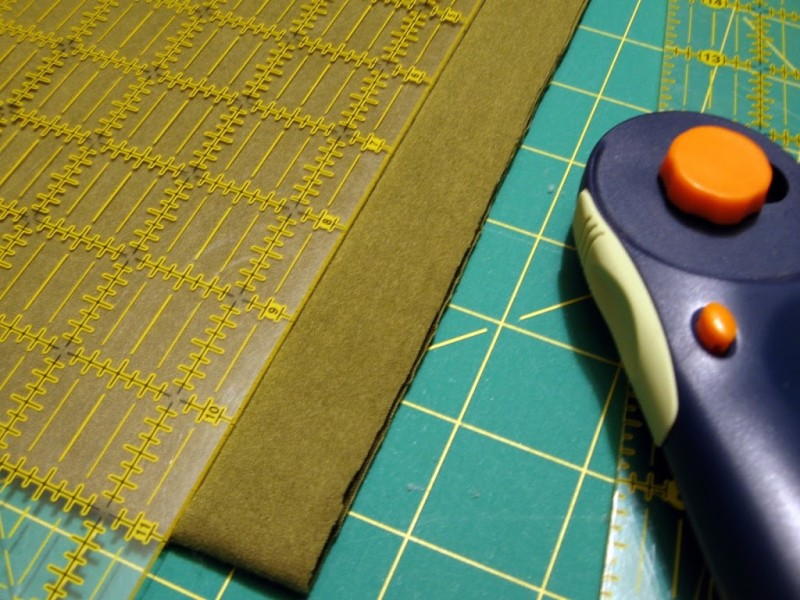
1. Cut strips. Using a rotary cutter and clear ruler, cut 1″ strips the full width of the fabric. This is easiest to do by folding again in half so a 24″ ruler can span the width. I cut 18 strips to have 9 rows on each side.
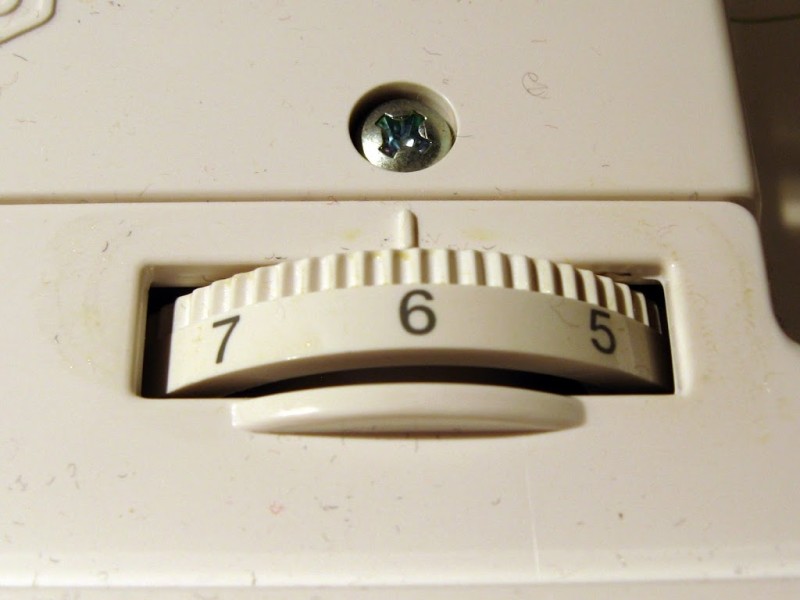
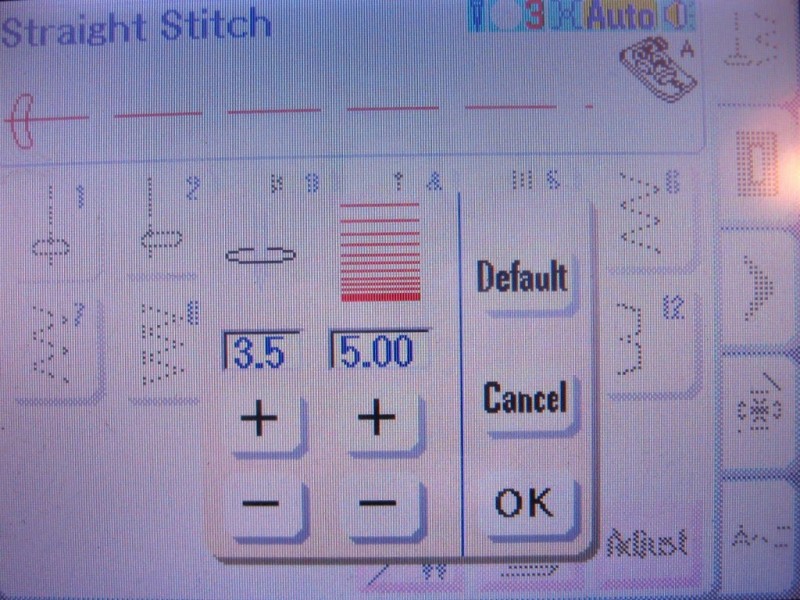
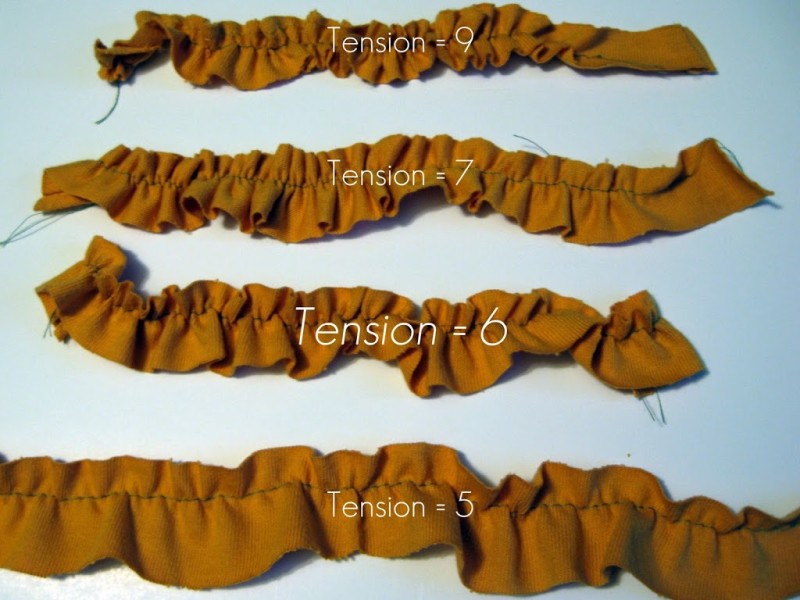
2. Make ruffles. There are many different ways to ruffle, but I did it by using the longest stitch length and adjusting the tension to get the density of ruffles I wanted.
I cut up a t-shirt to get strips to experiment on. I got the look I was after with a tension setting of 6. Ruffle each of the strips 1/4″ from the edge and set aside.
3. Cut front and back dress pieces. You’ll need pieces to sew all your ruffles to – cut rectangular panels several inches wider and longer than your desired finished dimensions.
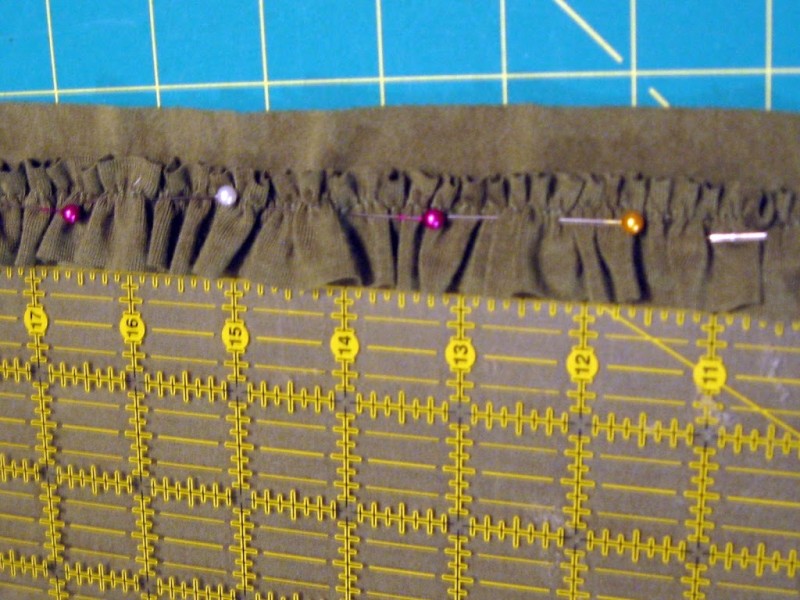
4. Pin ruffles in place. I placed my ruffles with 1/4″ showing between the rows. I wanted my top row to begin just below the bodice, so I placed my first row 1/2″ from the top, using my quilting ruler to keep everything lined up. Then measure and mark every 1 1/4″ on both sides using a disappearing pen. Lay the ruler across the marks and lay the ruffle along the edge. Pin in place along the stitching. Normally you would pin perpendicular so you can sew over the pins, but in this case you’ll want to pull the pins as you approach them.
5. Sew ruffles in place. Sewing with a slightly longer stitch length, stitch down the ruffles along the ruffling stitches. I found I got better results if I sort of “went for it”, rather than trying to fuss and press each ruffle under the presser foot. Remove the pins as you approach them. Set aside the ruffled panels.
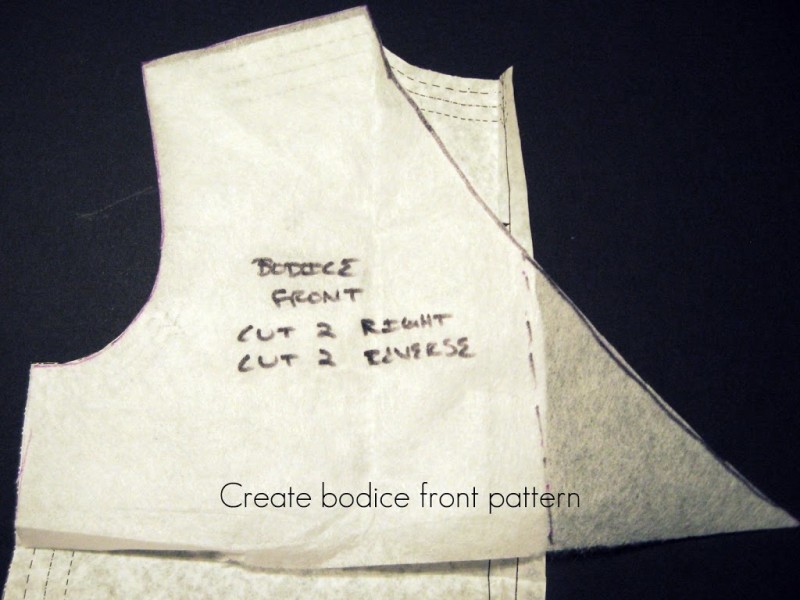
6. Make bodice front pattern. I used a shirt pattern I knew fit, and then made a pattern of the top part to a couple of inches below the armpit and drew a sweeping line to the side to give a wrap top look. Cut two pieces with it right side up, and two pieces with the pattern reversed. This is to make the outside and lining pieces.
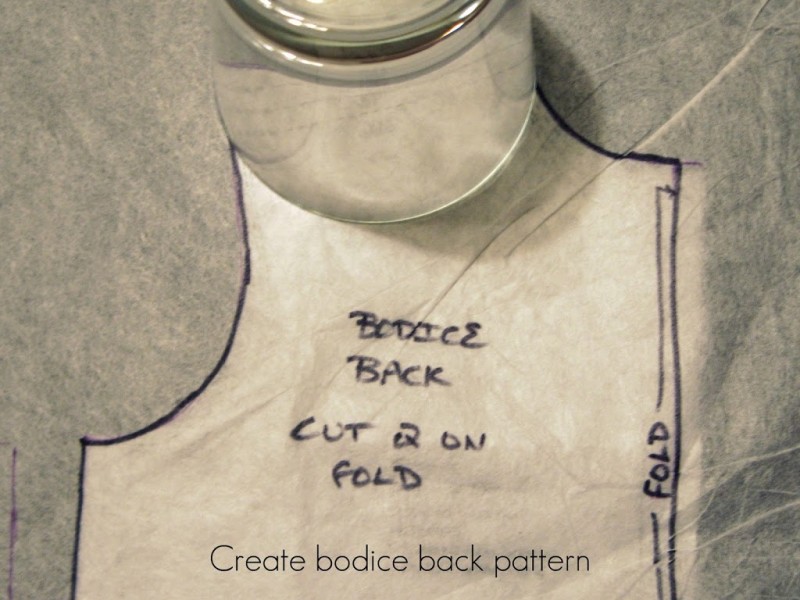
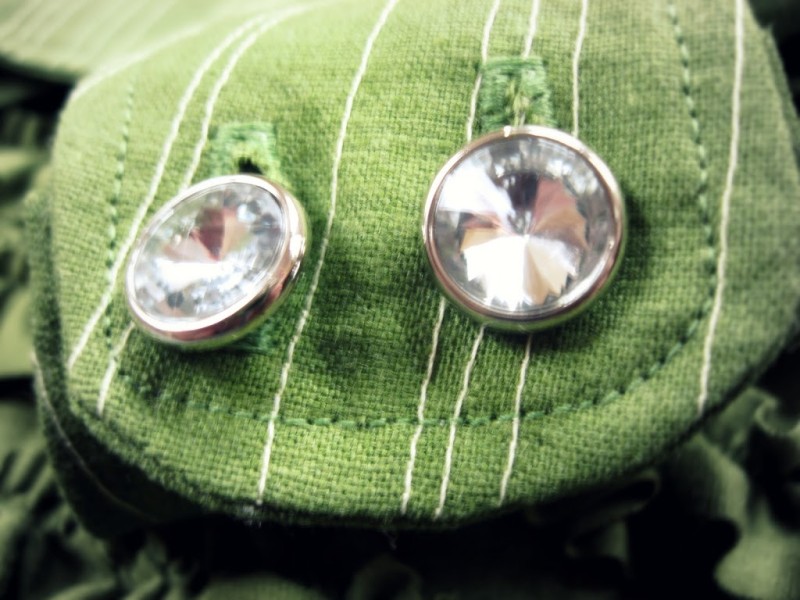
7. Make bodice back pattern. Using the back of the same shirt pattern, I shortened my pattern to match the front. I wanted to create rounded tabs to button towards the front of the bodice, so I extended the shoulder lines and traced a glass to get the rounded edge. Cut two pieces on the fold to make outer and lining pieces.
8. Stitch accent. If you want to add the stitching on the bodice, stitch parallel lines of stitching at random intervals.
9. Sew bodice and lining pieces. With right sides together, stitch the outside pieces together at the side seams. Repeat with lining pieces. Again with right sides together, stitch the front and lining pieces together, leaving the last 4″ open on one edge of the wrap front. Clip curves, turn and press. Press the lining under 1/4″.
10. Sew skirt pieces together. Measure the bottom of the finished bodice piece to see how wide the top of your skirt should be.  Lay the two panels of ruffles right sides together, lining up the rows of ruffles. Measure and place pins at the top the same width as the bodice bottom measurement. Measure and pin at the bottom of the skirt 1″ wider on each side. Pin a line connecting the two measured pins. Sew together. Trim and finish edges. Turn right side out. I was really surprised how well my rows of ruffles aligned.
11. Sew bodice front to skirt. With the bodice upside down and right sides facing, pin and sew the outside of the bodice only to the skirt. Press seams up toward the bodice.
12. Sew bodice lining. With the pressed edge tucked under, pin the lining to the seam allowance of the inside of the skirt. Topstitch from the outside about 1/8″ from the edge. I had to cut a little slit along my wrap portion to get everthing to go together.
13. Top stitch bodice. Top stitch around all edges of the bodice about 1/8″ from the edge.
14. Add buttonholes and buttons.  Measure the spacing of your buttons and sew buttonholes and corresponding buttons.
15. Trim bottom of dress. If needed, use a ruler to trip the bottom of the dress 1/4″ below the last ruffle. No need to finish the edge!
Yay! This project was featured:
This will be linked at Shwin&Shwin, and I’ll be linking up to the parties in my linky party directory and to:


wow this is so cute! i first i thought you might have used ruffled fabric with so many ruffles!
http://inthehammockvintage.blogspot.com
ADORABLE!!
I love all the ruffles!!! I also like that you went with green instead of yellow.
Great post! I love that you should the different tensions especially for someone like me…a beginning sewer!
Come win a wine cork!
http://gigglesglitzandglam.blogspot.com/2011/01/elephants-trunk-giveaway.html
That came out super cute. I love it. Luck little girl. http://www.couturiermommy.com
Thanks for sharing, a very lovly dress
This is simply precious! The green is gorgeous – amazing work! Hope you are enjoying your weekend ~ Stephanie Lynn
this is amazing i thought you used ruffle fabric also…may be trying this. this week!
stop by
Boerman Ramblings
Chrissy – please share if you do! I’d love to see your finished richly ruffled dress.
Love it! I’m adding that to my “to craft” list. Maybe for Easter if I don’t get it made sooner.
This turned out SO Darn cute! Love it!
I do hope you come link this up to my weekly Thursday through Sunday Making It With Allie Link Party! I think it would make a Fabulous addition!
AllieMakes.Blogspot.com
I have always wondered how that dress was made. Thanks for the tutorial.
it looks amazing!!!!!!!! love the color!!
http://katrihakes.blogspot.com
This is so adorable, Thanks for the tips.
SO cute!
Great job mama!! I featured you on my blog today: http://haveyouhuggedmetoday.blogspot.com/2011/01/saturday-sew-along.html
LOve this! Thank you for sharing!!
Do you have a way to download you pattern pieces for the top of the dress?
krisstout(at)hotmail(dot)com
This is beautiful!
I wish I had your sewing skills–I just had a baby girl in November, and I’d love to make her a dress like this!
Thanks for linking up to the oldies party this week–the new party will be live on Monday night.
Nancy
Lovely and so simple to do too, love your ideas, keep em comin’
can’t believe that i haven’t seen this before. Super cute!!!!